25 Nov
Many businesses use reverse proxy servers to route and secure network traffic. However, often they’re confused about how this differs from a traditional proxy server.
In this post, you’ll learn the fundamentals of reverse proxy servers, including what they are, how they work, their primary benefits, and how you can use them to speed up and secure your WordPress site.
Ready to explore?
Let’s get started!
Before we delve into the topic, let’s first understand what a proxy server is.
What is a Proxy Server?
A proxy server, also known as a forward proxy, is a server that routes traffic between the client(s) and another system, usually the one that is not on the network. Doing so allows it to regulate traffic based on predefined policies, convert and mask client IP addresses, impose security protocols, and restrict unknown traffic.
Proxy servers are frequently used in systems with shared networks, such as business organizations, data centers, etc. Proxy servers introduce a single interface through which clients interact.

Image via: Networkencyclopedia
What Is a Reverse Proxy?
A reverse proxy server is one that sits in front of web servers, and forwards clients’ (web browsers) requests to those web servers. Reverse proxies are commonly used to improve security, performance, and reliability.
A reverse proxy acts as a bridge between clients, users, and application servers. It manages all access policies and traffic routing and protects the identity of the server that actually processes the request.

Image via: Imperva
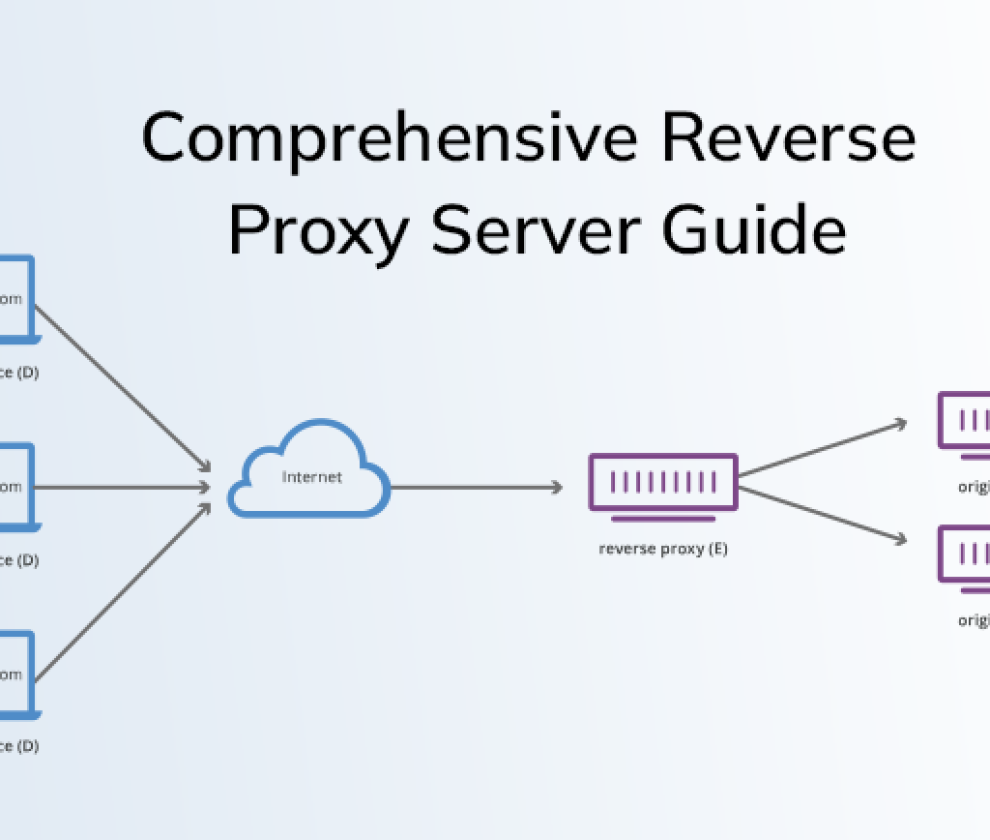
How a Reverse Proxy Works?
A reverse proxy server acts as a mediator, in a computer network. It sits in front of web server(s) interacting with users, preventing them from directly contacting the origin server. It acts as a gateway by forwarding client (web browser) requests to those servers.
It must be passed through by web browsers before forwarding a request to a server to be accomplished and then returning the server’s response.
A reverse proxy serves as a website’s “official representative.” Its address is as stated on the website. It sits at the site’s network’s edge, accepting web browser and mobile app requests for the website’s content, allowing organizations to hide multiple servers behind the same name, making it easier to remove, upgrade, add, or roll back services.
The 3 Most Popular Reverse Proxies
The 3 most popular reverse proxies are as follows:
1. HAProxy

Image via: Haproxy.com
High Availability Proxy or HAProxy, is a free, open-source, fast, reliable, and high-quality load balancer and proxying software for TCP and HTTP-based applications.
HAProxy is an HTTP reverse proxy, a TCP proxy and normalizer, an SSL/TLS terminator/initiator/offloader, a caching proxy, an HTTP compression offloader, a traffic regulator, a content-based switch, a FastCGI gateway, and many other things. It also protects against DDoS attacks and service abuse.
Proxying, SSL support, monitoring both server states and own state, high availability, load balancing, stickiness, content switching, HTTP rewriting and redirection, server protection, logging, statistics, and much more are some of HAProxy’s basic features.
2. NGINX

Image Via: FreeCodeCamp
NGINX is a free, open-source, extremely fast HTTP server as well as a reverse proxy. It can also be used as an IMAP/POP3 proxy server. NGINX proxy server is known for its speed, steadiness, feature set, ease of use, and low resource consumption.
NGINX is an event-driven architecture and can handle hundreds or thousands of concurrent connections because it uses HAProxy’s PROXY protocol. NGINX supports expedited reverse proxying with caching via the ngx_http_proxy_module module. This allows requests to be routed to another server via protocols other than HTTP FastCGI, SCGI, and Memcached.
It also supports load balancing and fault tolerance, both of which are critical components of large-scale distributed computing systems. The ngx_http_upstream_module module allows you to specify groups of backend servers to which client requests should be routed. This, in turn, makes your applications more robust, reliable, and accessible, as well as highly scalable.
3. Apache Traffic Server

Image Via: Medium.com
Apache Traffic Server, formerly owned by Yahoo and later transferred to the Apache Foundation, is a free, open-source, and extremely fast caching forward and reverse-proxy server.
It also functions as a load balancer and participates in flexible cache hierarchies. It supports keep-alive, sorting, and encrypting of content requests, and it is easily scalable via an API that enables people to create custom plugins to alter HTTP headers, manage ESI requests, and develop new cache algorithms.
Additionally, you can check the Apache HTTP server, also known as HTTPD. It is the world’s most popular web server that can be used and configured as a reverse proxy.
Reverse Proxy: Use Cases for WordPress Sites
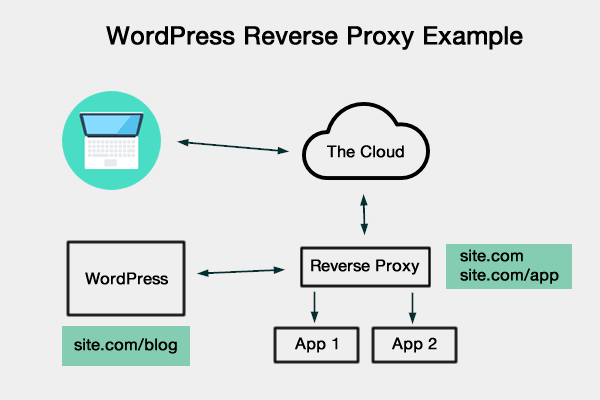
Image Via: Pagely.com
A WordPress Reverse Proxy is a fantastic tool! There are numerous benefits of WordPress Reverse Proxy Server. It lets you split your company’s domain name, which allows you to host different parts of your website on different systems or CMSs.
Businesses today make significant investments in their IT infrastructures, and their websites frequently run complex, bespoke applications. In addition, for internal security, companies wish to route web traffic through specific security systems (such as firewalls).
Implementing a WordPress Reverse Proxy server allows traffic to readily flow to and around the organization’s in-house IT infrastructure. This implies it can be subjected to whatever security checks your organization deems appropriate.
Once the web traffic has passed through your security systems, you can use the reverse proxy to direct it to a third-party server. WordPress sites can be accessed by browsing to a subdirectory of your domain. This is preferable to setting up secondary domains to use WordPress to power a subsite for your organization.
Nginx is used to implement a reverse proxy for all WordPress sites. There are three primary reasons for implementing a reverse proxy for all WordPress sites.
1. Hosted main and proxied sites on the same server:
If both the proxy and the primary site are hosted on the same server, the primary one can run a WordPress installation. A typical WordPress installation, on the other hand, is in charge of the proxy site.
2. Only the proxied site hosted on your server:
If you only have access to the proxied site and the corresponding web server, you must contact the server admin of the leading site. They will assist you in configuring the reverse proxy rules.
3. Your server only hosts the main site:
If only the main site and its equivalent web server are accessible, the reverse proxy must be configured. Create its rules for loading the proxied site from an external host.
The installation and implementation of the proxied site for loading through the reverse proxy is the responsibility of the secondary server administrator.
When Web hosting companies host your main site, you will have access to the Web hosting companies’ support team. You can open a support ticket to include the standard reverse proxy rules and customize them as you need.
How to Set Up Nginx as a Reverse Proxy?

Image Via: WP Bullet
If you’re planning to set up the Nginx Reverse Proxy on your own, then follow the steps below:
First of all, configure it to redirect to the proxied site as well.
Install Nginx, you can install Nginx in a different way depending on your web server’s operating system.
There are numerous Nginx packages to choose from. You can choose based on the version of your Linux distribution.
Here is the example:
The primary site is installed at the domain name myexample.com in the example below. The proxied WordPress site, on the other hand, is set up as a subdomain, i.e., blog.domain.com. Both of them are managed by Apache on an Ubuntu 18.04 web server. Now follow the commands below
sudo apt update

sudo apt install nginx
You must now configure Nginx to proxy requests for domains hosted on Apache. Create a new virtual host file for this purpose. The code in this example is included using the nano editor. You can, however, use any code editor you want.
sudo nano /etc/nginx/sites-available/myexample.com.conf
Now set Nginx directives to route requests to Apache after you add the below server {…} and location blocks:
server {
listen      80;
server_name myexample.com www. myexample.com;
index       index.php;
root        /var/www/ myexample.com/public    # fallback for index.php
location / {
try_files $uri $uri/ /index.php?$query_string;
}location /blog {
proxy_pass http://blogs.domain.com;proxy_http_version                 1.1;
proxy_cache_bypass                 $http_upgrade;
# Proxy headers
proxy_set_header Upgrade           $http_upgrade;
proxy_set_header Connection        "upgrade";
proxy_set_header Host              $host;
proxy_set_header X-Real-IP         $remote_addr;
proxy_set_header X-Forwarded-For   $proxy_add_x_forwarded_for;
proxy_set_header X-Forwarded-Proto $scheme;
proxy_set_header X-Forwarded-Host  $host;
proxy_set_header X-Forwarded-Port  $server_port;
# Proxy timeouts
proxy_connect_timeout              60s;
proxy_send_timeout                 60s;
proxy_read_timeout
}
Save the virtual host file now. After that, activate the new virtual host by creating a symlink to the myexample.com.conf file in the /etc/Nginx/sites-available and /etc/Nginx/sites-enabled directories.
sudo ln -s /etc/nginx/sites-available/myexample.com.conf /etc/nginx/sites-enabled/ myexample.com.conf
Then, check Nginx reverse proxy for any configuration errors.
sudo nginx -t
In case there are no errors, reload Nginx to apply the changes.
sudo systemctl reload nginx
Nginx is now successfully configured to act as a reverse proxy.
How to Set up Apache as a Reverse Proxy?
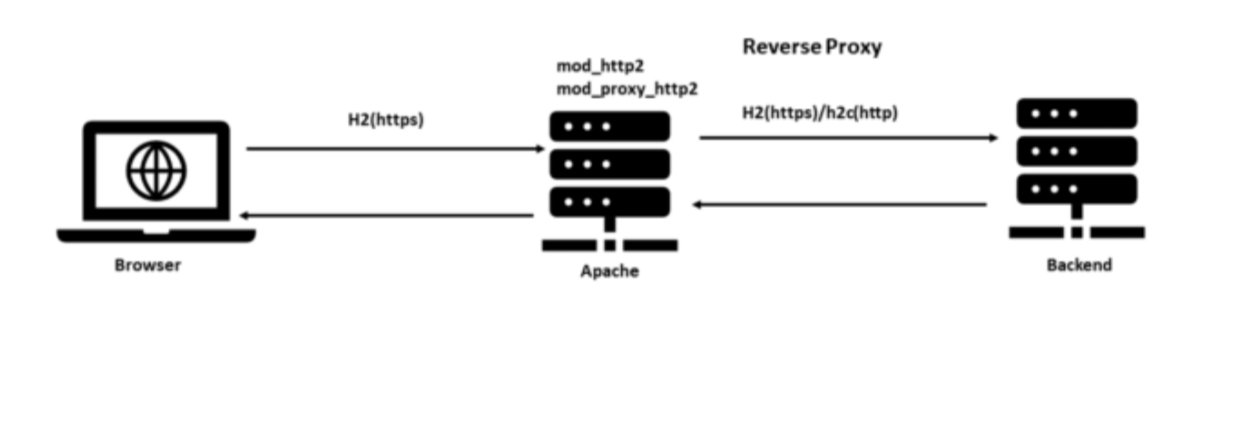
Image Via: Medium.com
To set up Apache as a Reverse Proxy, make sure you have two websites up and running at myexample.com and blogs.domain.com. The initial website can be any other site. But the second one has to be a WordPress site. It will be primarily used to load the root domain’s blog at the subdirectory link of myexample.com/blogs.
Begin Apache configuration by connecting to your server’s terminal via SSH and enabling the Apache proxy module.
sudo a2enmod proxy proxy_http SSL
When you run the above command, Apache will most likely restart in order to reload the newly defined directives.
To create a reverse proxy, you must now edit the virtual host file on your central server. The following code should be added:
<VirtualHost *>
DocumentRoot /var/www/app/public
SSLProxyEngine On    ProxyRequests off
ProxyPass /blog http://blog.domain.com
ProxyPassReverse /blog  http://blog.domain.com
</VirtualHost>
The ProxyPass directive generates a reverse proxy for the paths specified.
The ProxyPassReverse command, on the other hand, will intercept the HTTP response headers delivered by this reverse proxy and rewrite them to work with the Apache server.
After saving the file, edit the wp-config.php file by inserting the following code before the line asks you to prevent editing.
# ProxyPass Settings
# overrides the variables below to ensure that any
# request to /blog/* subdirectory is taken care of properly
$_SERVER['REQUEST_URI'] = '/blog' . $_SERVER['REQUEST_URI'];
$_SERVER['SCRIPT_NAME'] = '/blog' . $_SERVER['SCRIPT_NAME'];
$_SERVER['PHP_SELF'] = '/blog' . $_SERVER['PHP_SELF'];
Finally, you must update your WordPress site’s database to include the configuration values for the /blog subdirectory link. Run the SQL query below to accomplish this:
UPDATE wp_options SET option_value = 'https://www.myexample.com/blogs' WHERE option_name IN( 'siteurl', 'home' );
You can now go to https://www.myexample.com/blog and host your WordPress site at http://blog.domain.com without changing the URL.
You can continue to browse, write, edit, and manage your site as usual with WordPress.
Limitations of a Reverse Proxy
Reverse proxy servers bring in a lot of benefits. However, there are certain prominent limitations to reverse proxies; take a look at those limitations:
- A reverse proxy poses a substantial security risk as it can read and modify all traffic passing through it. When HTTPS traffic is routed through the reverse proxy, the data must be decrypted and encrypted. It implies that it should be the owner of the SSL/TLS certificate’s private keys. As a result, if a malicious party can negotiate your reverse proxy, it is permitted to log passwords and insert malware into your websites.
- Sometimes using a reverse proxy directly creates a single point of failure. This means if you use a reverse proxy as a front end to distribute multiple domains, its disconnection takes all of them offline at once.
- Using a third-party reverse proxy makes you give them sensitive information about your site. Of course, you’ll hire a reliable third-party vendor for a reverse proxy server, but you can’t be 100% sure about it.
- At times loading a WordPress Multisite installation on a reverse proxy can be troublesome to manage.
- Finally, restoring backups or allowing staging sites to go live on websites that use a reverse proxy prevents the proxied site from loading properly.
Choosing Between a CDN and a Reverse Proxy
Often, businesses are at a loss as to whether to use a CDN or a reverse proxy.
Before you make any choice, you must know that both CDNs and Reverse Proxies offer almost the same benefits.
So, the easiest way to make a choice between the two is to consider your needs. And if you already have a reverse proxy installed, you can still have CDN implemented. Using a CDN along with a reverse proxy will significantly improve performance and speed. Both of them cache the layer effectively.
The Bottom Line
So, this is all about the reverse proxy server. Hopefully, this article has been informative and enlightening for you and helps you set up reverse proxies on your own.
Latest posts by Naren Sharma (see all)
- Comprehensive Reverse Proxy Server Guide for WordPress - November 25, 2021